Tuesday 30 March 2010

Delphi Tutorial # 1

Introducing Delphi

Delphi is an application development tool in Windows platform. Using this software you can build some Windows application. With visual approach, you can create application with some codes. Delphi based on Pascal Object language. If you are familiar with Pascal, it will be very easy to understand Delphi. But if you don’t know Pascal, you can learn both Delphi and Pascal in my tutorial at the same time.

There are some words that have to be clear before we start learning Delphi, such as application, form and component.

Application or application program is rows of codes to be done by computer. There are two kinds of application. Windows application and console application. Windows application is an application that runs under Windows. Non-Windows application, such as DOS application usually called console application. Generally, a Windows application has a form, but of course an application can have some forms. When we execute a form in a program, it will become a window.

A form usually contains some other components (a form is also a component). Label, button, edit box are components. Some components are visible. Label, button and edit box are visible components. The invisible component is called control. In Delphi, a project contains an application, and an application contains some forms.

Running the IDE

IDE or Integrated Development Environment is a part of Delphi where we can create our application. In IDE we can visually create a user interface and write some codes.

We can run the Delphi IDE from start menu. The main appearance of Delphi IDE shows a new project (project1) and a form (form1). Now we will see the Delphi IDE below :

-         Main menu contains some menus (File, Edit, Search…etc)

-         Toolbar contains some icons / tools.

-         Form Window is where you design your interface visually

-         Object Inspector contains two tabs : Properties and Events

-         Component Palette contains components you can place in the form.

Changing Form Properties

An object has some characteristics. A person has name, age, weight etc. As an object, a form also has some characteristics : name, height, width, color etc.

You can change the properties of form through the object inspector. A form has fifty properties. But only some of them we often use. Now let’s change the name and the caption of  our form from the object inspector, and see what happen to it :

Name : My_Form

Caption : My First Form

Why should we set a name for our form ? because if we have more than one form in our project, My_Form is more easily remembered rather than Form1, Form2…….

Saving Project

Now we’re going to save our first project by choosing File – Save All. You must create a new folder, ie : PracticingDelphi. After you create a new folder then give a unit name and project name.
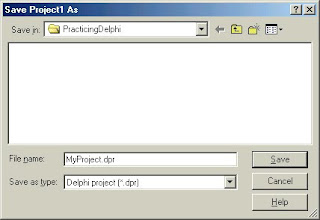

And there will be some files saved in the folder :

.cfg : contains project configurations

.dof : contains project options (linker, compiler, searching directories etc)

.dpr : a project file

.res : contains standard windows resources

.dfm : a form file

.pas : a unit resources file (Pascal object codes)

Running Program

You can press F9 to run the program. And the result is only a blank windows, because we haven’t added anything to our form :

After we run the program Delphi create an executable file named MyProject.exe

Go to Next tutorial

Monday 29 March 2010

Delphi - Interbase Tutorial # 7 : Modifying Query’s SQL Statement

In the previous tutorial I have shared how to use a Query component. We can modify the SQL statement in a Query. Use the previous form. Add a Label component, two Edit components and a Database component. A Database component is used for data connection, so when we run the program, the login form will appear at the first place. Our form will be like this :

Set the properties of the new added components

Label1

Caption<>

Edit1

Text"blank"

Edit2

Text"blank"

Database1

AliasNameALIASMYDATA
DatabaseNameMyDatabase

Change the DatabaseName property of the Query

Label1

DatabaseNameMyDatabase

Type the code below for the OnClick event of  the GO button :

procedure TForm1.Button1Click(Sender: TObject);

begin

  Query1.Close;

  Query1.SQL.Clear;

  Query1.SQL.Add

   ('Select * from EMPLOYEE');

  Query1.SQL.Add

   ('where AGE >= :firstparameter');

  Query1.SQL.Add

   ('and AGE <= :secondparameter');

  Query1.Prepare;

  Query1.Params[0].Value := StrToInt(Edit1.Text);

  Query1.Params[1].Value := StrToInt(Edit2.Text);

  Query1.Open;

end;

If you run the program and fill 32 in Edit1 and 35 in Edit2, you’ll get the result like this picture :

To modify the SQL statement in a Query component, first you have to deactivate the Query (Query1.Close;), clear the SQL statement (Query1.SQL.Clear;) and then you can add some SQL statement (Query1.SQL.Add(‘SQL statement’);). You can type SQL statement as much as you need. If you use parameters in the SQL statement, you can name the parameters with any meaningful names. In this example I name the first parameter with firstparameter and the second one with secondparameter. Then put the actual value into params() property of the Query. I put StrToInt(Edit1.Text) into params(0) and StrToInt(Edit2.Text) into params(1). You can also have parameters as much as you need. It begins with params(0).

Go to Previous Tutorial

Tuesday 23 March 2010

Delphi - Interbase Tutorial # 6 : Query

In Delphi, you can also use SQL to access your data. You have to use Query component that is in the Data Access Page of the component palette.

First, create a user interface like picture shown below :

Set the properties of the components

DataSource1

DataSetQuery1

Button1

Caption&G O

DBGrid1

DataSourceDataSource1

Query1

DatabaseNameALIASMYDATA
SQLselect * from employee where age >=30

You have to type the SQL code in the String List editor of Query component, see the picture below :

Type the code below for the OnClick event of  the GO button :

procedure TForm1.Button1Click(Sender: TObject);
begin
Query1.Open;
end; 

What is the meaning of Query1.Open  ?

This statement activate the Query and execute the SQL statement in SQL property of Query1. The result is like the picture shown below :

You can also add an exit button into the user interface above.

Go to Previous Tutorial or Next Tutorial

Sunday 21 March 2010

Delphi - Interbase Tutorial # 5 : Create a user interface for manipulating table using DBEdit

In the previous tutorial we created a user interface for manipulating table using DBGrid. Now we’re going to create one using DBEdit. We can use our previous program. Replace the DBGrid in the previous program with some labels and DBEdits, like the picture shown below :

Set the properties of the labels and DBEdits like tables below :

Label1

CaptionID

Label2

CaptionNAME

Label3

CaptionAGE

Label4

CaptionPHONE

DBEdit1

DataSourceDataSource1
DataFieldID

DBEdit2

DataSourceDataSource1
DataFieldNAME

DBEdit3

DataSourceDataSource1
DataFieldAGE

DBEdit4

DataSourceDataSource1
DataFieldPHONENUMBER

Use the codes for the OnClick event of the buttons. Do not change the properties of Form, Table, DataSource and Buttons. Run the program, and now we can manipulate the ‘employee’ table using Buttons and DBEdits.

Go to Previous Tutorial or Next Tutorial

Wednesday 17 March 2010

Free Software for Learning HTML

(Download Here)

When we learn HTML (Hyper Text Markup Language), we need a text editor, such as Notepad and a browser. Once we have finished writing some HTML codes, we save the codes in a file with .html extension. Then we run an internet browser to see if the codes run well or not. If it doesn’t, we go to the text editor and modify our HTML codes then try it in the browser again and so on. This makes me inconvenience. So I try to make it more convenient by creating a program that can free me from this to and fro situation.

Using this software we can get the result of HTML codes instantly by clicking RUN button. Type the HTML codes in the left window, and the result is in the right window.

type the HTML codes below, in the left window :

<html>
<head>
<p><a href="http://www.google.com">Google.com</a></p>
<p><a href="http://www.yahoo.com">Yahoo.com</a></p>
<p><a href="http://www.123codegenerator.blogspot.com">Download This Software Here</a></p>
</head>
<body>
</body>
</html>

then click Run to see the result


You can get this free software here

Tuesday 9 March 2010

Delphi - Interbase Tutorial # 4 : Exception Handler

In the previous tutorial, an error occur when you try to delete a record in ‘employee’ table. It is because of the ‘salary’ table refers to the record. An error message will appear. To avoid this, we’re going to create an exception handle. 

Let’s see what kind of error will happen if we try to delete a record in ‘employee’ table. Run the program from Delphi IDE (not the executable file). You’ll see the error message below :

From the message, the exception that raised is EDBEngineError. Let’s see our code for OnClick event of Delete button. You have to add an exception handle code using TRY…..EXCEPT :

procedure TForm1.DeleteClick(Sender: TObject);
begin
 try
  Table1.Delete;
 except
  on EDBEngineError do
  begin
  MessageDlg('You can not delete this record because another table is currently using the data',
  mtError,[mbOK],0)
  end;
 end;
end;

Then if you run the program and try to delete a record in ‘employee’ table that a record in ‘salary’ table refers to it, you’ll get a message like picture below :

Go to Previous Tutorial or Next Tutorial

Thursday 4 March 2010

Delphi - Interbase Tutorial # 3 : Create a user interface for manipulating table without DBNavigator

In the previous tutorial we have created a tiny user interface for manipulating table. Now we’re going to create a user interface without using a DBNavigator. If there is no DBNavigator, how do we manipulate our table ?. We’re going to use some buttons and codes to manipulate our table. Let’s see our blank form, add some components into it : a DBGrid, a Table, a DataSource, ten Buttons (Button1……Button10)

Set the properties of our components :

Form

CaptionEMPLOYEE TABLE

Table

ActiveTrue
DatabaseNameALIASMYDATA
TableNameEMPLOYEE

DataSource

DataSetTable1

Button1

Caption&First
NameFirst

Button2

Caption&Last
NameLast

Button3

Caption&Previous
NamePrevious

Button4

Caption&Next
NameNext

Button5

Caption&Add
NameAdd

Button6

Caption&Edit
NameEdit

Button7

Caption&Save
NameSave

Button8

Caption&Cancel
NameCancel

Button9

Caption&Delete
NameDelete

Button10

CaptionE&xit
Name

Exit

Now our form appears like the picture below :

Type the code for the OnClick event of the buttons :

procedure TForm1.ExitClick(Sender: TObject);
begin
 Application.Terminate;
end;

procedure TForm1.FirstClick(Sender: TObject);
begin
 Table1.First;{go to the first record}
end;

procedure TForm1.LastClick(Sender: TObject);
begin
 Table1.Last;{go to the last record}
end;

procedure TForm1.PreviousClick(Sender: TObject);
begin
 Table1.Prior;{go to the previous record}
end;

procedure TForm1.NextClick(Sender: TObject);
begin
 Table1.Next;{go to the next record}
end;

procedure TForm1.AddClick(Sender: TObject);
begin
 Table1.Append;{insert new record }
end;

procedure TForm1.EditClick(Sender: TObject);
begin
 Table1.Edit;{edit existing record }
end;

procedure TForm1.SaveClick(Sender: TObject);
begin
 Table1.Post;{save record }
end;

procedure TForm1.CancelClick(Sender: TObject);
begin
 Table1.Cancel;{cancel record }
end;

procedure TForm1.DeleteClick(Sender: TObject);
begin
 Table1.Delete;{delete record }
end;

To insert data we can use Table1.Append or Table1.Insert procedure. Find out yourself, the different between these two procedures.

Run the program. You can navigate and manipulating employee table by clicking the button. Notice that you can not delete any record in ‘employee’ table, because there another table that refers to ‘id’ column value of table employee. If you try to click Delete button, an error message will be appear :

In the next tutorial I will show you how to handle this exception.

Go to Previous Tutorial or Next Tutorial

Monday 1 March 2010

Delphi - Interbase Tutorial # 2 : Create a user interface for manipulating table

After we create an alias name for our database, we’re going to create a tiny user interface for manipulating and retrieving the tables in the database. Run Delphi from start menu, you’ll have a project with a form. Add a Button, a DBgrid, a DBNavigator, a Table and a DataSource.

Button component is in the Standard page of component palette. DBGrid and DBNavigator are in Data Controls page of component palette. Table and DataSource are in the Data Access page of component palette Then set the properties as the table shown below :

Form

CaptionEMPLOYEE TABLE

Button

Caption&Exit
NameExit

Table

ActiveTrue
DatabaseNameALIASMYDATA
TableNameEMPLOYEE

DataSource

DataSetTable1

DBGrid

DataSourceDataSource1

DB Navigator

DataSourceDataSource1

Now our form appears like the picture below :

Type the code for the OnClick event of Exit button :

    procedure TForm1.ExitClick(Sender: TObject);
    begin
     Application.Terminate;
    end;


Run the program. You can navigate and manipulate employee table using DBNavigator. To exit program click the Exit button.

Go to Previous Tutorial or Next Tutorial

These links are part of a pay per click advertising program called Infolinks. Infolinks is an In Text advertising service; they take my text and create links within it. If you hover your mouse over these double underlined links, you will see a small dialog box containing an advertisement related to the text. You can choose to move the mouse away and go on with your browsing, or to click on the box and visit the relevant ad. Click here to learn more about Infolinks Double Underline Link Ads.