Wednesday, 5 May 2010

Text Area Code Generator

In this first project, we're going to create an application that can generate HTML codes to create a text area. First you have to create a form like the picture below :

Now, write the codes for each event of the components :

When the first time we run the program, we set the default values of some component's properties. So we write some codes on FormActivate event of Form1 :

  procedure TForm1.FormActivate(Sender: TObject);
  begin
   Memo1.Text := '';
   Memo2.Text := '';
   Memo2.SetFocus;
   Edit1.Enabled := false;
   Edit2.Enabled := false;
   Edit3.Enabled := false;
   RadioButton1.Checked := true;
   RadioButton2.Checked := false;
   RadioGroup1.ItemIndex := 0;
   Edit4.Text := '1';
   Edit5.Text := '1';
  end;

The codes for RadioButtons ( Text Only and Link Codes ) :

  procedure TForm1.RadioButton1Click(Sender: TObject);
  begin
   Edit1.Enabled := false;
   Edit2.Enabled := false;
   Edit3.Enabled := false;
   Memo2.Enabled := true;
   Memo2.SetFocus;
  end;

  procedure TForm1.RadioButton2Click(Sender: TObject);
  begin
   Edit1.Enabled := true;
   Edit2.Enabled := true;
   Edit3.Enabled := true;
   Memo2.Enabled := false;
   Edit1.SetFocus;
  end;

We need to limit the input of rows and columns for numeric inputs only :

  procedure TForm1.Edit4KeyPress(Sender: TObject; var Key: Char);
  begin
   if not (key in ['0'..'9', #8]) then key := #0;
  end;

  procedure TForm1.Edit5KeyPress(Sender: TObject; var Key: Char);
  begin
   if not (key in ['0'..'9', #8]) then key := #0;
  end;


And the other codes for the events of the rest components are :


procedure TForm1.GenerateButtonClick(Sender: TObject);

var

 LinkBanner : string;

begin

 if RadioButton1.Checked then

  begin

   memo1.Text :='<p align="'+RadioGroup1.Items.String

                [RadioGroup1.ItemIndex]+'"><textarea name="code" rows="' + 

                Edit4.Text + '"  cols="' +Edit5.Text + '">' + memo2.Text  + 

                '</textarea></p>';                                  

  end else

  begin

   LinkBanner := '<a href="' + Edit2.Text +

                 '"target="_blank"><img src="'+Edit1.Text +

                 '" border="0" alt="' + Edit3.Text + '" /></a>';

   memo1.Text := RadioGroup1.Items.Strings[RadioGroup1.ItemIndex] + 

                 '"><textarea name="code" rows="' +           

                 Edit4.Text + '" cols="'+Edit5.Text + '">' + LinkBanner +

                 '</textarea></p>';

  end;

end;


procedure TForm1.ClearButtonClick(Sender: TObject);

begin
  memo1.Text := '';

end;


procedure TForm1.ExitButtonClick(Sender: TObject);
begin
  Application.Terminate;
end;

To see the complete codes you can download this project here.

Creating Text Area

What is text area ? You can see the example of text area below :

To create a text area, use this HTML tag :

<p align="center"><textarea name="code" rows="6" cols="20"> Your Text Here </textarea></p>

You can save some HTML codes that contain a link and a banner for link or banner exchange. So the codes can be copied and pasted into another web page. To create a text area with a link and a banner, use these HTML codes :

<a href="Link URL" target="_blank"><img src="Image URL " border="0" alt="Tutorial Blog" /></a>

Text Area Code Generator

You can also use Text Area Code Generator to create a text area.

Using this software, you don’t need to type the HTML code to create a text area. You can generate the code by clicking Generate HTML Codes button. Click here to download this software.

Wednesday, 28 April 2010

Operators ( Example Console Program using Delphi )

This is an example program using operators

program Using_Operators;

{$APPTYPE CONSOLE}
uses
SysUtils;

begin
   // Insert user code here
   writeln('7 + 8 = ', 7 + 8);
   writeln('7 - 8 = ', 7 - 8);
   writeln('7 x 8 = ', 7 * 8);
   writeln('15 : 3 = ', 15/3:0:0);
   { :0:0 is for formatting. You should try to ommit it }
   { and see what happend at the result }
   writeln('17 mod 4 = ', 17 mod 4);
   writeln('17 div 4 = ', 17 div 4);
   writeln('3 + 2 x 4 = ', 3 + 2 * 4); // see the different between
   writeln('(3 + 2) x 4 = ', (3 + 2) * 4); // these two expressions
   writeln(8 shr 1); // logic operator
   writeln(8 shl 1); // logic operator
   writeln(1 = 2); // boolean operator
   writeln(not (1 = 2)); // boolean operator
   writeln(7 >= 2); // relational operator
   writeln('a' < 'b'); // relational operator
   writeln('123delphicodes' = '123
delphicodes'); // string operator
   writeln('123
DelphiCodes' = '123delphicodes'); // string operator
   writeln('123
DelphiCodes' < '123delphicodes'); // string operator
   readln; // wait until enter button is pushed
end.

Delphi Tutorial # 7

Operators

Operator is a symbol to do some operation, such as : sum, product, division, compare etc. Operator involves two or more operands. Operator and operand form an expression. Example :

    12 + 15 = 27

see the table below :

OperatorsOperands
+12
=15

27

arithmetic operators

Operator
*
/
div
mod
+
-

logic operators

Operator
not
and
or
xor
shl
shr

boolean operators

Operator
not
and
or
xor

relational operators 

Operator
>
<
>=
<=
<>
=

string operator

all relational operators also can be use for string :

Operator
>
<
>=
<=
<>
=

In the example, I will show you how to use these operators.

Go to Previous Tutorial or Next Tutorial

Friday, 23 April 2010

Delphi Tutorial # 6

Console Application 

Before we go further with visual programming, it is important to understand the basic element of Delphi. In the first tutorial about, I have mention that a console application is a DOS (Disk Operating System) application. It is a non Windows application. Using console programming, you can focus on the codes only. Meanwhile you can forget about visual programming, and learn about Pascal language.

To make a console application, choose File – Close All (if thee is still a form in IDE). Then choose File – New, select Console Application. Delphi will show Project1.dpr window :

Declare constants and variables after uses SysUtils;

  const

   length : integer = 12;

   width : integer = 8;

  var

   area : integer;

Insert user code between begin …. end.

  area := length*width;

  writeln('Length of rectangle = ',length);

  writeln('Width of rectangle = ',width);

  writeln('The area = ',area);

  readln;

The complete codes of Project1.dpr :

  program Project1;

  {$APPTYPE CONSOLE}

  uses

   SysUtils;

  const

   length : integer = 12;

   width : integer = 8;

  var

   area : integer;

  begin

   // Insert user code here

   area := length*width;

   writeln('Length of rectangle = ',length);

   writeln('Width of rectangle = ',width);

   writeln('The area = ',area);

   readln;

  end.

Run the program, and the result is :

The last code readln; is for delaying program until you press Enter button.

Comment

// Insert user code here is an example of comment. Comment can be written in three ways :

-         Written between { }

-         Written between * *

-         Begun with // like the example above

Assigning a value to a variable

From the program above, we assign a value to area variable using assignment operator :=. The syntax is :

    variable := value;

so the code is :

    area := length*width;

Go to Previous Tutorial or Next Tutorial

Thursday, 22 April 2010

Showing the Hidden Files in Windows XP

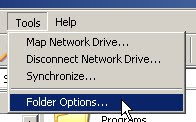
Windows hides the important system files. But Some of hidden files are dangerous to our system. And we can call them viruses. Here is the way to make all hidden files shown : Run windows explorer by clicking the mouse right button on Start Menu. Then choose Explore. 

Choose Tools – Folder Option, like the picture above. The Folder Option window will appear :

Choose Show hidden files and folders. Remove the checklist form Hide extensions for known file type and Hide protected operating system files (Recommended). Click Apply, then OK. Now all hidden files will be shown.

Wednesday, 21 April 2010

Enabling Turn Off Autoplay

Windows provides Autoplay feature to examine a removable media that newly discovered by the system. It is closely like AutoRun feature. Removable media can be a flashdisk, a CD, a DVD, a memory card or an external hard disk etc.

But this feature has a disadvantage. If the removable media connected to the computer is infected by some viruses, the virus will be automatically loaded to memory, or even your system will be automatically infected. Virus is usually an executable hidden file. And in a certain way will be automatically executed when a media or a directory / folder  is being connected to the system. Usually by using an autorun.inf file.

To avoid this, we have to enable Turn Off Autoplay feature. From Start Up menu, choose Run. Type gpedit.msc then click OK.

The Group Policy window will appear :

There are two configuration : Computer Configuration and User Configuration. Form Computer Configuration, choose Administrative Templates - System, then choose Turn off Autoplay as the picture shown below :

Then Turn off Autoplay Properties window will appear. Choose Enabled and All drives. Then click Apply – OK :

You also have to do these steps for User Configuration. Choose Administrative Templates - System, then choose Turn off Autoplay  as the picture shown below :

Choose Enabled and All drives. Then click Apply – OK.

Once the Turn Off Autoplay feature has been enabled, just remember do not ever double click a folder or a media that is infected by viruses. It is more save to use Windows Explorer, by clicking the mouse right button on Start Menu, then choose Explorer. In this way, the hidden viruses will not be executed. It will decrease the risk of viral infection to your system. Then all you have to do is deleting suspicious hidden files. But before you can do this, you have to make all the hidden files shown.

These links are part of a pay per click advertising program called Infolinks. Infolinks is an In Text advertising service; they take my text and create links within it. If you hover your mouse over these double underlined links, you will see a small dialog box containing an advertisement related to the text. You can choose to move the mouse away and go on with your browsing, or to click on the box and visit the relevant ad. Click here to learn more about Infolinks Double Underline Link Ads.