Friday, 26 February 2010

Delphi - Interbase Tutorial # 1 : Borland Database Engine

Connecting Interbase Database Using BDE (Borland Database Engine)

Manipulating and retrieving a database using some SQL codes is such a nightmare for me. But it does not mean that my previous Interbase Tutorials are useless. For database programmer, knowing SQL is a must. But the users do not need to know about SQL.

Now, I am going to share how to create user interface for manipulating, retrieving and maintaining a database. We can use any development tools to create the interface, but in this tutorial I use Delphi.

Before we start working with Delphi, we have to make an alias of the database. There many method of connecting database, but we’re going to use BDE (Borland Database Engine). After we start BDE Administrator from start menu, the main window will appear :

You can start creating a new connection by choosing Object – New

Choose the Interbase as database driver, then press OK :

You’ll get an alias name INTERBASE1 (see the picture below)

You can rename the alias name. In this case we use the alias name : ALIASMYDATA

Fill in the SERVER NAME the location of our database : C:\mydata\MYDATA.GDB
And USER NAME : NEW_USER
If our database located in a remote computer, we have to put the computer / server name. Use slash not back slash : server_name:/mydata/MYDATA.GDB
Then click apply as the picture above.
Now we have an alias for MYDATA.GBD. The user interface we’re going to develop using Delphi have to be connected to the alias : ALIASMYDATA

To test the connection choose File – Diagnostics. The Communication diagnostic Tool window will appear. Type the password, then click Test. If the connection work, you’ll get the results message that InterBase Communication Test Passed!

Go to Previous Tutorial or Next tutorial

Stored Procedures ( Interbase Tutorial # 15 )

Every programming language allows programmers to create procedures, if it doesn’t, we can call it a bad programming language. A stored procedure is a program to be stored in the database server. And it can be called or run manually by other program. 

A stored procedure contains header and body. Header contains procedure name, input parameter(s) and output parameter(s). Body contains local variable(s) ( optional ) and a block of statements.

To be clear, let’s see the table below :

A Stored ProcedureHeaderProcedure Name
Input Parameter(s)
Output Parameter(s)
BodyLocal Variable(s)
A Block of Statements

The general syntax of a stored procedure is :

  CREATE PROCEDURE procedure_name (input_variable(s) data_type(s))
  RETURNS (output_variable(s) data_type(s))
  AS
   BEGIN
    Local variable(s)
    A block of Statements if procedure and trigger language
   END


Example :

In the previous tutorial we have learnt how to retrieve data using SELECT. Let us review again how to get employee’s name whose age is above 27. The statement is :

    select name from employee where age>27

The output is :

NAME  
============= 
Isaac Newton
Archimedes
Frank Borland
Max Planck

Now we can get same output, but this time we’re going to create a procedure. The procedure will be :

  create procedure get_name (employee_age integer)
  returns (employee_name char(30))
  as
  begin
    for select name
        from employee
        where age > :employee_age
        into :employee_name
    do
        suspend;
  end

suspend send the value back to the calling application ( Interbase Windows ISQL )

Execute the procedure above in the SQL windows. Now execute this blow statement :

    select * from get_name(27)

You’ll get the same output :

NAME  
============= 
Isaac Newton
Archimedes
Frank Borland
Max Planck

Using Local Variables

Let us modify the procedure above using a local variable

  create procedure get_name_line (employee_age integer)
  returns (line_number integer, employee_name char(30))
  as
  begin
   line_number = 0;
   for select name
       from employee
       where age > :employee_age
       into :employee_name
   do
    begin
     line_number=line_number+1;
     suspend;
    end
  end


after you execute the procedure, you can try this statement below :

    select * from get_name_line(27)

The output is :

LINE_NUMBER   EMPLOYEE_NAME  
============================== 
          1   Isaac Newton 
          2   Archimedes
          3   Frank Borland 
          4   Max Planck

Go to Previous Tutorial or Next Tutorial

Access Privileges ( Interbase Tutorial # 14 )

So far we have learnt how to develop a database. But only the owner of the database ( in this case NEW_USER ) and SYSDBA can access the database. Some other users may use the database. We can grant some privileges to these users, so they can retrieve or manipulate the table.

Before we start learning about access privileges, you need to create a new user. You can see how to create a new user in my first tutorial. Let’s name the new user OTHER_USER, and you can give any password you want for this user.

Now there are three users in your interbase server : SYSDBA, NEW_USER and OTHER_USER. SYSDBA can access the database created by NEW_USER, but OTHER_USER can’t. If you want OTHER_USER to retrieve or manipulate your database, you have to give some privileges to this user.

You can see the available access privileges in the table below :

SELECTRead data
DELETEDelete data
INSERTWrite new data
UPDATEModify existing data
REFERENCESCreate a table with a foreign key refers to the primary key
EXECUTECall stored procedures
ALLSELECT, DELETE, INSERT, UPDATE and REFERENCES
ROLEAll privileges assigned to the ROLE

Giving Access privileges using GRANT

The syntax is :

    GRANT privilege(s) ON table TO user

Example : We want to give SELECT privilege on ‘employee’ table to OTHER_USER, so OTHER_USER can retrieve the database. The statement will be :

    grant select on employee to other_user

With Grant Option

We can use WITH GRANT OPTION clause to allow the user to give the privileges we’ve given to other users.

Example : 

    grant select, delete on employee to other_user
    with grant option


Revoking Privileges

We can also revoke the privileges we’ve given to a user. The syntax is :

    REVOKE privilege(s) ON table FROM user

Example : We want to revoke SELECT privilege on ‘employee’ table from OTHER_USER. The statement will be :

    revoke select on employee from other_user

ROLE

If you want to give one or more privileges to some user using GRANT, you will type a lot of GRANT statement. You can create a ROLE to reduce the statement you type. A ROLE can contain one or more privileges. Follow these steps below to create and grant a ROLE to users :

- Define a ROLE 
   The syntax : CREATE ROLE role_name
- Inserting privileges to the ROLE
   The syntax : GRANT privileges(s) ON table TO role_name
- Granting ROLE to users
   GRANT role_name TO user(s)

Example :

    create ROLE myrole

    grant select, update, insert, delete on employee to myrole

    grant myrole to other_user

Go to Previous Tutorial or Next Tutorial


Sunday, 21 February 2010

String Operator and Converting Uppercase ( Interbase Tutorial # 13 )

String Operator

We can also join two or more character strings into a single string using string operator. The string to be joined can be the value of a column we retrieve, or we may add some character strings. The operator for joining some character strings is || .

Execute these some SQL statements below :

    select name || ‘ is ’ || age || ‘ years old’ from employee

and we’ll get the data output :

================================== 
Isaac Newton is 30 years old  
Blaise Pascal is 25 years old  
Archimedes is 32 years old  
George Boole is 27 years old  
Frank Borland is 31 years old  
Max Planck is 28 years old

    select ’Boolean Algebra is developed by ‘ || name from employee
    where name=’George Boole’


the output is :

==================================== 
Boolean Algebra is developed by George Boole

select name || ‘ earns USD ‘ || totalsalary || ‘ per month’
from employee, salary
where id=employee_id


the output is :

================================ 
Isaac Newton earns USD 1100 per month  
Blaise Pascal earns USD 2200 per month  
Archimedes earns USD 3300 per month  
George Boole earns USD 4400 per month  

select ‘The highest salary is USD ‘ || max(totalsalary)from salary

the output is :

====================================== 
The highest salary is USD 4400

select ‘The total expense for salary is USD ‘ || sum(totalsalary)   from salary

the output is :

================================================ 
The total expense for salary is USD 11000

Now you can try another combinations of some character strings.

Converting Uppercase

To convert character values to uppercase, we use UPPER function. When you create a domain, use CHECK constraint to ensure that the value you enter is always in uppercase.
If you want the value of ‘name’ column always in uppercase, the statement to create domain is :

    CREATE DOMAIN string30 AS varchar(30)
    CHECK (VALUE = UPPER (VALUE))

Go to Previous Tutorial or Next Tutorial

Inner Join and Outer Join ( Interbase Tutorial # 12 )

In Interbase you can join two or more tables. As a result of joining tables, Interbase will build a new table, which sometimes called ‘dynamic table’ or ‘virtual table’. Two kind of joins supported by Interbase : Inner Join and Outer Join.
Before we start to learn about Inner Join and Outer Join, execute these statement below :

    insert into employee (id, name, age, phonenumber) 
    values ('5',’Frank Borland','31','555-9999')

    insert into employee (id, name, age, phonenumber) 
    values ('6',’Max Planck’,'28','555-1199')

INNER JOIN

Inner join link rows in tables based on specified join conditions and return only those rows that match the join conditions. If a joined column contains a NULL value for a given row, that row is not included in the results table. Inner joins are the more common type because they restrict the data returned and show a clear relationship between two or more tables.

Example : You want to build a virtual table which contains two columns : id and total salary. The SQL statement is :

    select a.name, b.salary from employee a inner join salary b
    on a.id = b.employee_id


note :
a is correlation name or alias of ‘employee’ table
b is correlation name or alias of ‘salary’ table
you can make any alias name, ie : a, b, table1, table2, alias1, alias2....... etc

the output is :

NAME              SALARY 
======================== 
Isaac Newton        1000 
Blaise Pascal       2000 
Archimedes          3000 
George Boole        4000 

OUTER JOIN

Outer joins link rows in tables based on specified join conditions but return rows whether they match the join conditions or not. Outer joins are useful for viewing joined rows in the context of rows that do not meet the join conditions. 

Example : You also want to build a virtual table which contains two columns : id and total salary. But this time you use OUTER JOIN. The SQL statement is :

    select a.name, b.salary from employee a left outer join salary b
    on a.id = b.employee_id


the output is :

NAME                 SALARY 
============================ 
Isaac Newton           1000 
Blaise Pascal          2000 
Archimedes             3000 
George Boole           4000 
Frank Borland        <>
Max Planck           <> 


Form the output of both examples above, you can see the difference between INNER JOIN and OUTER JOIN. OUTER JOIN returns NULL value rows, but INNER JOIN doesn’t.

Go to Previous Tutorial or Next Tutorial

Friday, 19 February 2010

Adding Free Hit Counter to Your Blog or Website

You can also view this post in Bahasa Indonesia

Sometimes we want to know how many visitors have visited our blog or website. It can be done by adding a hit counter. To add a hit counter to your blog or website, click here. You’ll be directed to hit-counter-download.com main page, see the picture below :

Choose one of the available hit counter. This page provide many kinds of hit counter :
- Basics Hit Counters
- Cool Hit Counters
- Digital Hit Counters
- Fancy Hit Counters

Then you’ll be directed to the submission form :

Fill the form, like picture above. Of course you need to enter your password. After you click Submit you’ll get HTML code that you can copy and paste into your blog or website

Thursday, 18 February 2010

Retrieving Data from Two Table ( Interbase Tutorial # 11 )

We already have two tables in our database. Each table contains some populations. Now let’s see what we have in each table using SELECT statement.

    select * from employee

  ID NAME         AGE PHONENUMBER  
==================================

  1 Isaac Newton   30 555-5555  
  2 Blaise Pascal  25 555-1234  
  3 Archimedes     32 555-2233  
  4 George Boole   27 555-4521

    select * from salary

 SALARY_ID   EMPLOYEE_ID   SALARY BONUS TOTALSALARY 
======================================================= 

         1             1     1000   100        1100 
         2             2     2000   200        2200 
         3             3     3000   300        3300 
         4             4     4000   400        4400

Now we’re going to get employee’s name and their total salary. It will be a little bit complicated, because the ‘name’ column is in ‘employee’ table and the ‘totalsalary’ column is in ‘salary’ table. But don’t be worry, we can also retrieve data from two table using SQL statement. And the statement is :

    select name, totalsalary from employee, salary 
    where employee.id = salary.employee_id

The output is :

NAME                 TOTALSALARY
========================

Isaac Newton                          1100
Blaise Pascal                           2200
Archimedes                            3300
George Boole                          4400

The WHERE clause is for comparing the value of ‘id’ column in ‘employee’ table with the value of ‘employee_id’ in ‘salary’ table.

Now we’re going to get names and their total salaries of employee whose age is 30 year above. The statement will be :

select name, totalsalary from employee, salary 
where age>=30 and employee.id = salary.employee_id

The output is :

NAME         TOTALSALARY 
========================= 

Isaac Newton        1100 
Archimedes          3300 

Go to Previous Tutorial or Next Tutorial

Tuesday, 16 February 2010

facebook widget

Adding a Facebook Widget to your Blog/Web

You can also view this post in Bahasa Indonesia

It’s quite simple to add a FaceBook Widget to your blog or website. Just follow these steps below :

1. From your profile click Create a Profile Badge text link

2. You can edit your badge by clicking Edit this badge

3. You can choose the displayed items on your badge by checking them in the list. Then click save.

4. If you have a Blogspot or TypePad account, you’ll be directed to the page. If you click other, you’ll get the code. You can copy and paste the code to wherever you want.

Subquery and Aggregate function ( Interbase Tutorial # 10 )

Subquery

In a WHERE clause, you have a column, a comparative operator and a value to be compared with the column. Subquery provide a value from the other table that will be compared with the column you have in a WHERE clause. In some case we need a subquery for retrieving data.

For example, we want to get a name who earns 3300 a month. The problem is, we don’t have ‘name’ column in the ‘salary’ table. In this case we have to use subquery to get a value to be compared.

In ‘salary’ table we have ‘employee_id’ column which has a constraint value that refers to ‘id’ column in ‘employee’ table. Fist, we have to get an employee_id who earns 3300 from ‘salary’ table, then we compare the employee_id with ‘id’ column in ‘employee’ table to get a name. and the SQL statement will be :

  select name from employee

  where id = (select employee_id from salary where totalsalary=3300)

and the output will be :

NAME  
============================== 

Archimedes

Now, I will give you a problem :
We want to get the total salary of the employee whose phone number is 555-1234.
Figure out the SQL statement to solve this problem !

Aggregate Function

SQL provide some aggregate functions that calculate some values in columns. There are five aggregate functions that provided by SQL :

AVG 
Get the average value in a group of rows

COUNT 
Count the number of rows. You can use WHERE clause here to specify the rows you count

MIN 
Get the minimum value in a group of rows

MAX
Get the minimum value in a group of rows

SUM
Adds numeric values in a group of rows

Some examples of using aggregate function :

   select avg(age) from employee

   select avg(totalsalary) from salary

   select min(salary) from salary

   select count(totalsalary) from salary where totalsalary>2000

   select sum(totalsalary) from salary

You can try other SQL statement using aggregate functions.

Go to Previous Tutorial or Next tutorial

Monday, 15 February 2010

Search Condition ( Interbase Tutorial # 9 )

NOT

You can use NOT if you want to retrieve data which value is not equal to the condition. The syntax is :

    SELECT column FROM table
    WHERE NOT column = value

The other way to get the same data is :

    SELECT column FROM table
    WHERE column != value

Example 1 : we want to retrieve all data except data which age is above or equal to 30.

    select * from employee where not age<30

the statement above will have the same output with this statement below :

    select * from employee where age>=30

Example 2 : we want to retrieve data except the data which name is Archimedes.

    select * from employee where name!=’Archimedes’

LIKE

LIKE is used for retrieving data which has a particular matches with the pattern condition you give. The syntax is :

    SELECT column FROM table
    WHERE column LIKE ‘%pattern’

Example 3 : we want to retrieve data which name is ended with a particular pattern ‘ton’ 

    select * from employee where name like ‘%ton’

Example 4 : we want to retrieve data which name has a particular pattern ‘chi’ in the middle.

    select * from employee where name like ‘%chi%’
 
Example 5 : we want to retrieve data which name is started with a particular pattern ‘Ge’ 

    select * from employee where name like ‘Ge%’

STARTING WITH

You can use STARTING WITH if you want to retrieve data which column’s value started with a pattern. The syntax is :

    SELECT column FROM table
    WHERE column STARTING WITH pattern

Example 6 : we want to retrieve data which name is started with ‘Bla’

    select * from employee where name STARTING WITH ‘Bla’

it will have same output with the statement below :

    select * from employee where name like ‘Bla%’

CONTAINING

You can use CONTAINING to retrieve data which contain a value. The syntax is :

    SELECT column FROM table
    WHERE column CONTAINING value

Example 7 : we want to retrieve data which name contains ‘s’ letter

    select * from employee where name containing ‘s’


BETWEEN and IN

BETWEEN is for retrieving data within a range value. The syntax is :

    SELECT column FROM table
    WHERE column BETWEEN value1 AND value2

The statement below will get the data which name is started with a letter between C and J.

    select * from employee where name between ‘C’ and ‘J’

IN is for retrieving data with several values to be compared. The syntax is :

    SELECT column FROM table
    WHERE column IN (value1, value2, value3…….)

The statement below will get the data which age is 25, 27 or 32

    select * from employee where age in (‘25’,’27’,’32’)

Go to Previous Tutorial or Next Tutorial

Sunday, 14 February 2010

Retrieving Data ( Interbase Tutorial # 8 )

Now we’re going to populate our database again. To avoid typing the SQL statement and executing them one by one in the Interbase Windows ISQL, type these SQL statements below in a text editor :

  connect 'c:\mydata\mydata.gdb'
  user 'NEW_USER' password 'password';

  insert into employee (id, name, age, phonenumber) 
  values ('1','Isaac Newton','30','555-5555');

  insert into employee (id, name, age, phonenumber) 
  values ('2','Blaise Pascal','25','555-1234');

  insert into employee (id, name, age, phonenumber) 
  values ('3','Archimedes','32','555-2233');

  insert into employee (id, name, age, phonenumber) 
  values ('4','George Boole','27','555-4521');

  insert into salary (salary_id, employee_id, salary, bonus) 
  values ('1','1','1000','100');

  insert into salary (salary_id, employee_id, salary, bonus) 
  values ('2','2','2000','200');

  insert into salary (salary_id, employee_id, salary, bonus) 
  values ('3','3','3000','300');

  insert into salary (salary_id, employee_id, salary, bonus) 
  values ('4','4','4000','400');


(note : if you type SQL statements in a text editor, you have to put a ‘;’ at the end of each statement) 
 
Save the statements above in a file named ‘inputdata.txt’. Then execute it in the Interbase Windows ISQL by choosing File – Run an ISQL Script.

After populating our database, now we’re going to get the data out and use them. To get the data out we use SELECT statement. The SELECT statement is the most important, because if we have a data structure but we can not get them out and use them, it will be useless. The syntax is :

  SELECT column1,column2…. FROM TableName

or

  SELECT * FROM TableName

SELECT statement has six keywords : DISTINCT, FROM, WHERE, GROUP BY, HAVING and ORDER BY.

WHERE clause

WHERE clause will limit the retrieved rows with specified conditions. Only the rows which has the specified conditions will be retrieved. The syntax is :

  SELECT column1,column2…. FROM TableName
  WHERE condition


Execute these statements below and see what happen in the output windows :

  select * from employee where age>=30

  select name, phonenumber from employee where age>=30 

  select name, phonenumber from employee where not age>=30 

  select name, phonenumber from employee where (age>=30) and (id>1)

  select * from employee where (age>30) or (age<26)


ORDER BY clause

ORDER BY clause will order the output of a SELECT statement by the specified column. OERDER BY has a syntax :

  ORDER BY column ASC

or

  ORDER BY column DESC

Execute these statements below and see what happen in the output windows :

  select * from employee order by age asc

  select * from employee order by age desc

  select * from employee where age <>

DISTINCT clause

DISTINCT clause will eliminate duplicate rows of the output of a SELECT statement. The syntax is :

  SELECT DISTINCT column FROM table

GROUP BY

GROUP BY clause will group rows according the value of specified column. The syntax is :

  SELECT column FROM table GROUP BY column

HAVING clause

Having clause will specify search condition and to use with GROUP BY clause. The syntax is :

  SELECT column FROM table GROUP BY column HAVING search_condition

Go to Previous Tutorial or Next Tutorial

Friday, 12 February 2010

Primary Key, Foreign Key, Constraint ( Interbase Tutorial # 7 )

Every table must have a primary key. Only one primary key can be created in a table. But we may have a collective combination of some columns to form a primary key. Primary key has to be a column which has a unique value. In our case, ‘employee’ table also must have a primary key. The column which has a unique value is ‘id’ column. 
The better way to create ‘employee’ table with a primary key is :

(Note : before you execute the SQL codes below, you have to drop your previous table in the database)

   create table employee(
   id domain_id not null primary key,
   name string30 not null,
   age domain_age not null,
   phonenumber string12 not null);


a table can also has a foreign key. Foreign key is a column or a combination of some columns in a table. The value must refer to the primary key which is in the table or other table. Now we’re going to create a table which has a foreign key refers to the primary key of ‘employee’ table.

 create table salary(
 salary_id domain_id not null primary key,
 employee_id domain_id not null,
 salary integer not null,
 bonus integer not null,
 totalsalary computed by (salary+bonus),
 constraint fk1 foreign key (employee_id) references employee(id));

(note : fk1 is the name of the constraint)

now we have a better database than our previous. We can see what is in our database by choosing Metadata - Extract Table. And the output is :

/* Extract Database D:\mydata\MYDATA.GDB */
CREATE DATABASE "D:\mydata\MYDATA.GDB" PAGE_SIZE 1024 
;

/* Domain definitions */
CREATE DOMAIN STRING30 AS VARCHAR(30);
CREATE DOMAIN STRING12 AS VARCHAR(12);
CREATE DOMAIN DOMAIN_ID AS INTEGER
  check(value>0);
CREATE DOMAIN DOMAIN_AGE AS INTEGER
  check(value>18 and value<55);>/* Grant permissions for this database */

Go to Previous Tutorial or Next Tutorial

Tuesday, 9 February 2010

Modifying Table and Computed Column ( Interbase Tutorial # 6 )

You can modify your table using ALTER TABLE statement. With this statement you can add a columns into your table or you can delete a column as well. The syntax of this statement is :

For adding a column :

    ALTER TABLE TableName ADD columnname datatype

For dropping a column :

    ALTER TABLE TableName DROP columnname

Example 1 : in ‘employee’ table, we have four columns : id, name, age and phonenumber. We’re going to delete age column and add a column named bithdate. 
First we delete age column using this statement :

    Alter table employee drop age

Age column has been dropped. Now we’re adding birthdate column using this statement :

    Alter table employee add birthdate date

We use date data type for birtdate column. Now we have four column in ‘employee’ table : id, name, phonenumber, birthdate.

To see the changes we've made in 'employee' table, choose Metadata - Extract Table. And the output is :

/* Extract Table EMPLOYEE */

/* Table: EMPLOYEE, Owner: NEW_USER */
CREATE TABLE EMPLOYEE (ID INTEGER NOT NULL,
  NAME VARCHAR(30) NOT NULL,
  PHONENUMBER VARCHAR(12) NOT NULL,
  BIRTHDATE DATE);

Computed column

We can also have a column that has a value based on the values of other columns in the table. The syntax to create a computed column is :

   ColumnName COMPUTED BY ( arithmetic operation ) 

Example 2 : in ‘employee’ table we’re going to add three columns : salary, bonus, totalsalary. And the totalsalary column’s value = salary column’s value + bonus column’s value.

The statement will be like this :

    Alter table employee add salary integer

    Alter table employee add bonus integer

    Alter table employee add totalsalary computed by (salary+bonus)


You have to execute the statements above one by one in the InterBase Interactive SQL window. Now we have ‘employee’ table which has seven columns : id, name, phonenumber, birthdate, salary, bonus and totalsalary.
To see what we have in mydata.gdb database choose Metadata – Extract Database. And the output is :

/* Extract Database D:\mydata\MYDATA.GDB */
CREATE DATABASE "D:\mydata\MYDATA.GDB" PAGE_SIZE 1024 
;

/* Domain definitions */
CREATE DOMAIN STRING30 AS VARCHAR(30);
CREATE DOMAIN STRING12 AS VARCHAR(12);
CREATE DOMAIN DOMAIN_ID AS INTEGER
  check(value>0);
CREATE DOMAIN DOMAIN_AGE AS INTEGER

  check(value>18 and value<55);

Go to Previous Tutorial or Next Tutorial

Friday, 5 February 2010

Domain ( Interbase Tutorial # 5 )

What is Domain ?

Let us see our SQL script in the previous tutorial for creating table ‘employee’ :

create table employee(
id integer not null,
name varchar(30) not null,
age integer not null,
phonenumber varchar(12) not null)


We have an integer data type for column ‘id’ and ‘age’. As we know integer has range value between -2,147,483,648 to 2,147,483,647. We can insert a negative value to these columns. But in the real world, id and age can not have a negative value.
We can solve this problem by creating a DOMAIN. DOMAIN is a customized column definition.

The syntax to create a domain is :

CREATE DOMAIN domain_name AS data type
DEFAULT devault_value NOT NULL
CHECK (condition)


DEFAULT clause and CHECK clause are optional.

Type the codes below in the text editor, and save it with file name ‘mydata_domain.txt’.

create database 'c:\mydata\mydata.gdb'
user 'NEW_USER' password 'password';

create domain string30 as varchar(30);
create domain string12 as varchar(12);
create domain domain_id as integer check(value>0);
create domain domain_age as integer
check(value>18 and value<55);


Go to InterBase Interactive SQL window.

You can not run the script above, because database 'c:\mydata\mydata.gdb' is slready exist. You need to drop the old database first.

Connect to the old database, then choose File – Drop Database. So the old database ‘c:\mydata\mydata.gdb' is now deleted. Then you run the script above by choosing File – Run an ISQL Script. And choose your ISQL script file : ‘mydata_domain.txt’. Now you have a better column definition in your table ‘employee’.

Go to Previous Tutorial or NextTutorial

Thursday, 4 February 2010

Inserting, Reading, Updating and Deleting Data ( Interbase Tutorial # 4 )

We already have a database ‘mydata.gdb’, and it contains a table ‘employee’. Now we’re going to populate our database.

Inserting Data

The syntax for inserting data into a table is :

INSERT INTO TableName (field1,field2,field3,….)
VALUES (‘value1’,’value2’,’value3’,…)


Go to the Interbase Windows ISQL from the start menu. Connect to your database. Insert first record into your table ‘employee’ by typing these SQL codes in the SQL statement area :

insert into employee (id, name, age, phonenumber)
values ('1','Isaac Newton','30','555-5555')

then execute the codes. Now you have your first record in your table :

Id : 1
Name : Isaac Newton
Age : 30
Phonenumber : 555-5555

Now insert records below into your table ‘employee’ with the same way :

Id : 2
Name : Blaise Pascal
Age : 25
Phonenumber : 555-1234

Id : 3
Name : Archimedes
Age : 32
Phonenumber : 555-2233

Id : 4
Name : George Boole
Age : 27
Phonenumber : 555-4521

You have to type the same SQL codes for each record. If you’ve got hundreds of records, it will be a nightmare to do this. And I won’t do this. Of course there is more civilized way to do this. Soon I will share how to create a “user friendly interface”.

Reading Data

We have four records in our table, now we’re reading the record using this syntax :

SELECT column1,column2…. FROM TableName

If you want to read all columns of your records, the syntax is :

SELECT * FROM TableName

Example1 : if you want to read all columns in table ‘employee’ the code will be

select * from employee

Example2 : If you only want to read column ‘name’ and ‘age’ of your table, the codes will be

select name, age from employee

Updating Data

If you want to update your data in the table use this syntax :

UPDATE TableName
SET column = value
WHERE condition


WHERE is optional. If there’s no WHERE, all the records will be updated. Otherwise, it will make restrictive change to the record which is in the condition.

Example 3 : You want to increase all ages of your record by 1

update employee set age = age + 1


Example 4 : If you want to change Archimedes’ phone number, you have to use WHERE clause

update employee set phonenumber = ‘555-7777’
where name=’Archimedes’


Deleting Data

To delete data from your table use this syntax :

DELETE from TableName
WHERE condition

If there is no WHERE clause, all the record will be deleted from the table. If you use WHERE clause, only a record which has the condition will be deleted.

Example 5 : You want to delete employee whose age is above 30

delete from employee where age > 30

Committing Your Work

After you execute some SQL codes, you need to commit your work. If you don’t, other users won’t see the changes you have made. Commit your work by choosing File – Commit work.

Go to Previous Tutorial or NextTutorial

Tuesday, 2 February 2010

Creating a Database ( Interbase Tutorial # 3 )

What is database ?

A database is like a container. You have some tables in the container. Each table related to others with some special ways, so the owner of the database can easily maintain or manipulate the tables.

To create new database we have to run InterBase Windows Interactive SQL from the start menu.


Choose Create database, then the Create Database Window appears.

Enter your database name, for example : c:\mydata\mydatabase.gdb
Enter your username and password then press OK.

Now you’ve got a database named ‘mydatabase.gdb’ in folder ‘mydata’ , but you haven’t got any tables in it.

Creating a table

A table always has some rows and columns. Where each row represent each record of your table and each column represent each field of your record.

For example


a record of the table above has four fields : ID, Name, Age and PhoneNumber

To create a table in interbase, you have to write some Structured Query Language (SQL) codes in the InterBase Interactive SQL window. The SQL codes to create the table above is shown below :

create table employee(
id integer not null,
name varchar(30) not null,
age integer not null,
phonenumber varchar(12) not null)


then execute your codes.
Now, see each field we have in the table ‘employee’ :

fields data type
id integer
name string (has maximum character = 30)
age integer
phonenumber string (has maximum character = 12)

not null’ means that each field must have a value

Now you already have a database contains a table named ‘employee’. You can create another table with the same way. The number of table depends on your need.

Creating a Database Using Text Editor

Another way to create a database, you can type your SQL codes in a text editor (ie : notepad) before you execute them in InterBase Interactive SQL window.


Type these SQL codes in the text editor, then save it with a name : ‘mydata.txt’.

create database 'c:\mydata\mydata.gdb'
user 'NEW_USER' password 'password';

create table employee(
id integer not null,
name varchar(30) not null,
age integer not null,
phonenumber varchar(12) not null);


Go to the InterBase Interactive SQL window and execute the codes by choosing File – Run an ISQL script. And choose your ISQL script file : ‘mydata.txt’. If your SQL script has no errors, the database ‘mydata.gdb’ will be created and it contains a table ‘employee’.

Go to Previous Tutorial or NextTutorial

Monday, 1 February 2010

Changing the SYSDBA default password ( Interbase Tutorial # 2 )

You can also see this post in Bahasa Indonesia

In the previous tutorial, we have learnt to create a new user. The default password that we use to log in is ‘masterkey’. It is the default password of super user SYSDBA.

Now, we are going to change this default password using our own. Because everyone can be easily connected to your database, and may do some harmful actions to your database, if we are still using the default password.

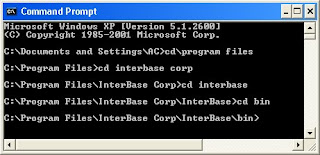
First, we have to run the command prompt from the start menu. Go to the directory where the executable file ‘gsec.exe’ located. It is usually located in :

C:\Program Files\InterBase Corp\InterBase\bin>

See the picture below


Then we need to log in using SYSDBA and the default password. Type this command :

gsec –user sysdba –password masterkey

change the password using this command :

modify sysdba –pw newpassword

The default password now has been changed with the new one : ‘newpassword’
Type ‘quit’ to exit the program.

Go To Previous Tutorial or NextTutorial

These links are part of a pay per click advertising program called Infolinks. Infolinks is an In Text advertising service; they take my text and create links within it. If you hover your mouse over these double underlined links, you will see a small dialog box containing an advertisement related to the text. You can choose to move the mouse away and go on with your browsing, or to click on the box and visit the relevant ad. Click here to learn more about Infolinks Double Underline Link Ads.